Stencil3 Manual
Last updated for: v3.0.0-alpha.7
This manual is best viewed in MdBook: [https://mrt-map.github.io/stencil3/docs]. (It is also still available on GitHub Wiki for historical purposes.)
Stencil3 is an application maintained and built by MRT Mapping Services to edit PLA3 map data for the street map of the MRT City Map.
Installation
- Universal
- Cargo
- Run
cargo install --git https://github.com/MRT-Map/stencil3 - Launch stencil3 with
stencil3
- Run
- Cargo
- Windows
- Scoop (untested)
scoop install "https://raw.githubusercontent.com/MRT-Map/stencil3/master/build/windows/scoop.json"
- msi
- Download the .msi file in the assets folder of the latest GitHub release
- Open the .msi file and follow the instructions
- Launch stencil3 in file explorer in
[Drive]:\Program Files\stencil3\bin - Remember to pin it to start/taskbar if it isn’t indexed in the search bar ;)
- Scoop (untested)
- MacOS
- dmg
- Download the .dmg file in the assets folder of the latest GitHub release
- Open the .dmg file and drag the application into the folder
- Launch stencil3
- Homebrew
brew install --cask mrt-map/mrt-map/stencil3
- dmg
- Linux
- deb
- Download the .deb file in the assets folder of the latest GitHub release
- Extract & install the file… TODO write instructions
- Arch PKGBUILD
- Add to
/etc/pacman.conf:[arch-mrt-map] Server = https://mrt-map.github.io/arch-mrt-map/x86_64 SigLevel = Optional TrustAll sudo pacman -Sy stencil3
- Add to
- deb
FAQ & Troubleshooting
- Can I use Stencil3 for general purpose map annotating?
- You technically can, though it’s not recommended
- I found a bug / problem! / Stencil3 crashed on me!
- Check the logs folder for the latest panic log.
- Check here (TODO) to see where your logs folder is.
- If it’s to do with toml deserialisation, check that your toml files are syntactically correct.
- Otherwise, open an issue in this repository, and check if your issue is a duplicate of another one
- (You can also DM me on Discord, but if you have a GitHub account please use issues)
- Check the logs folder for the latest panic log.
Quickstart
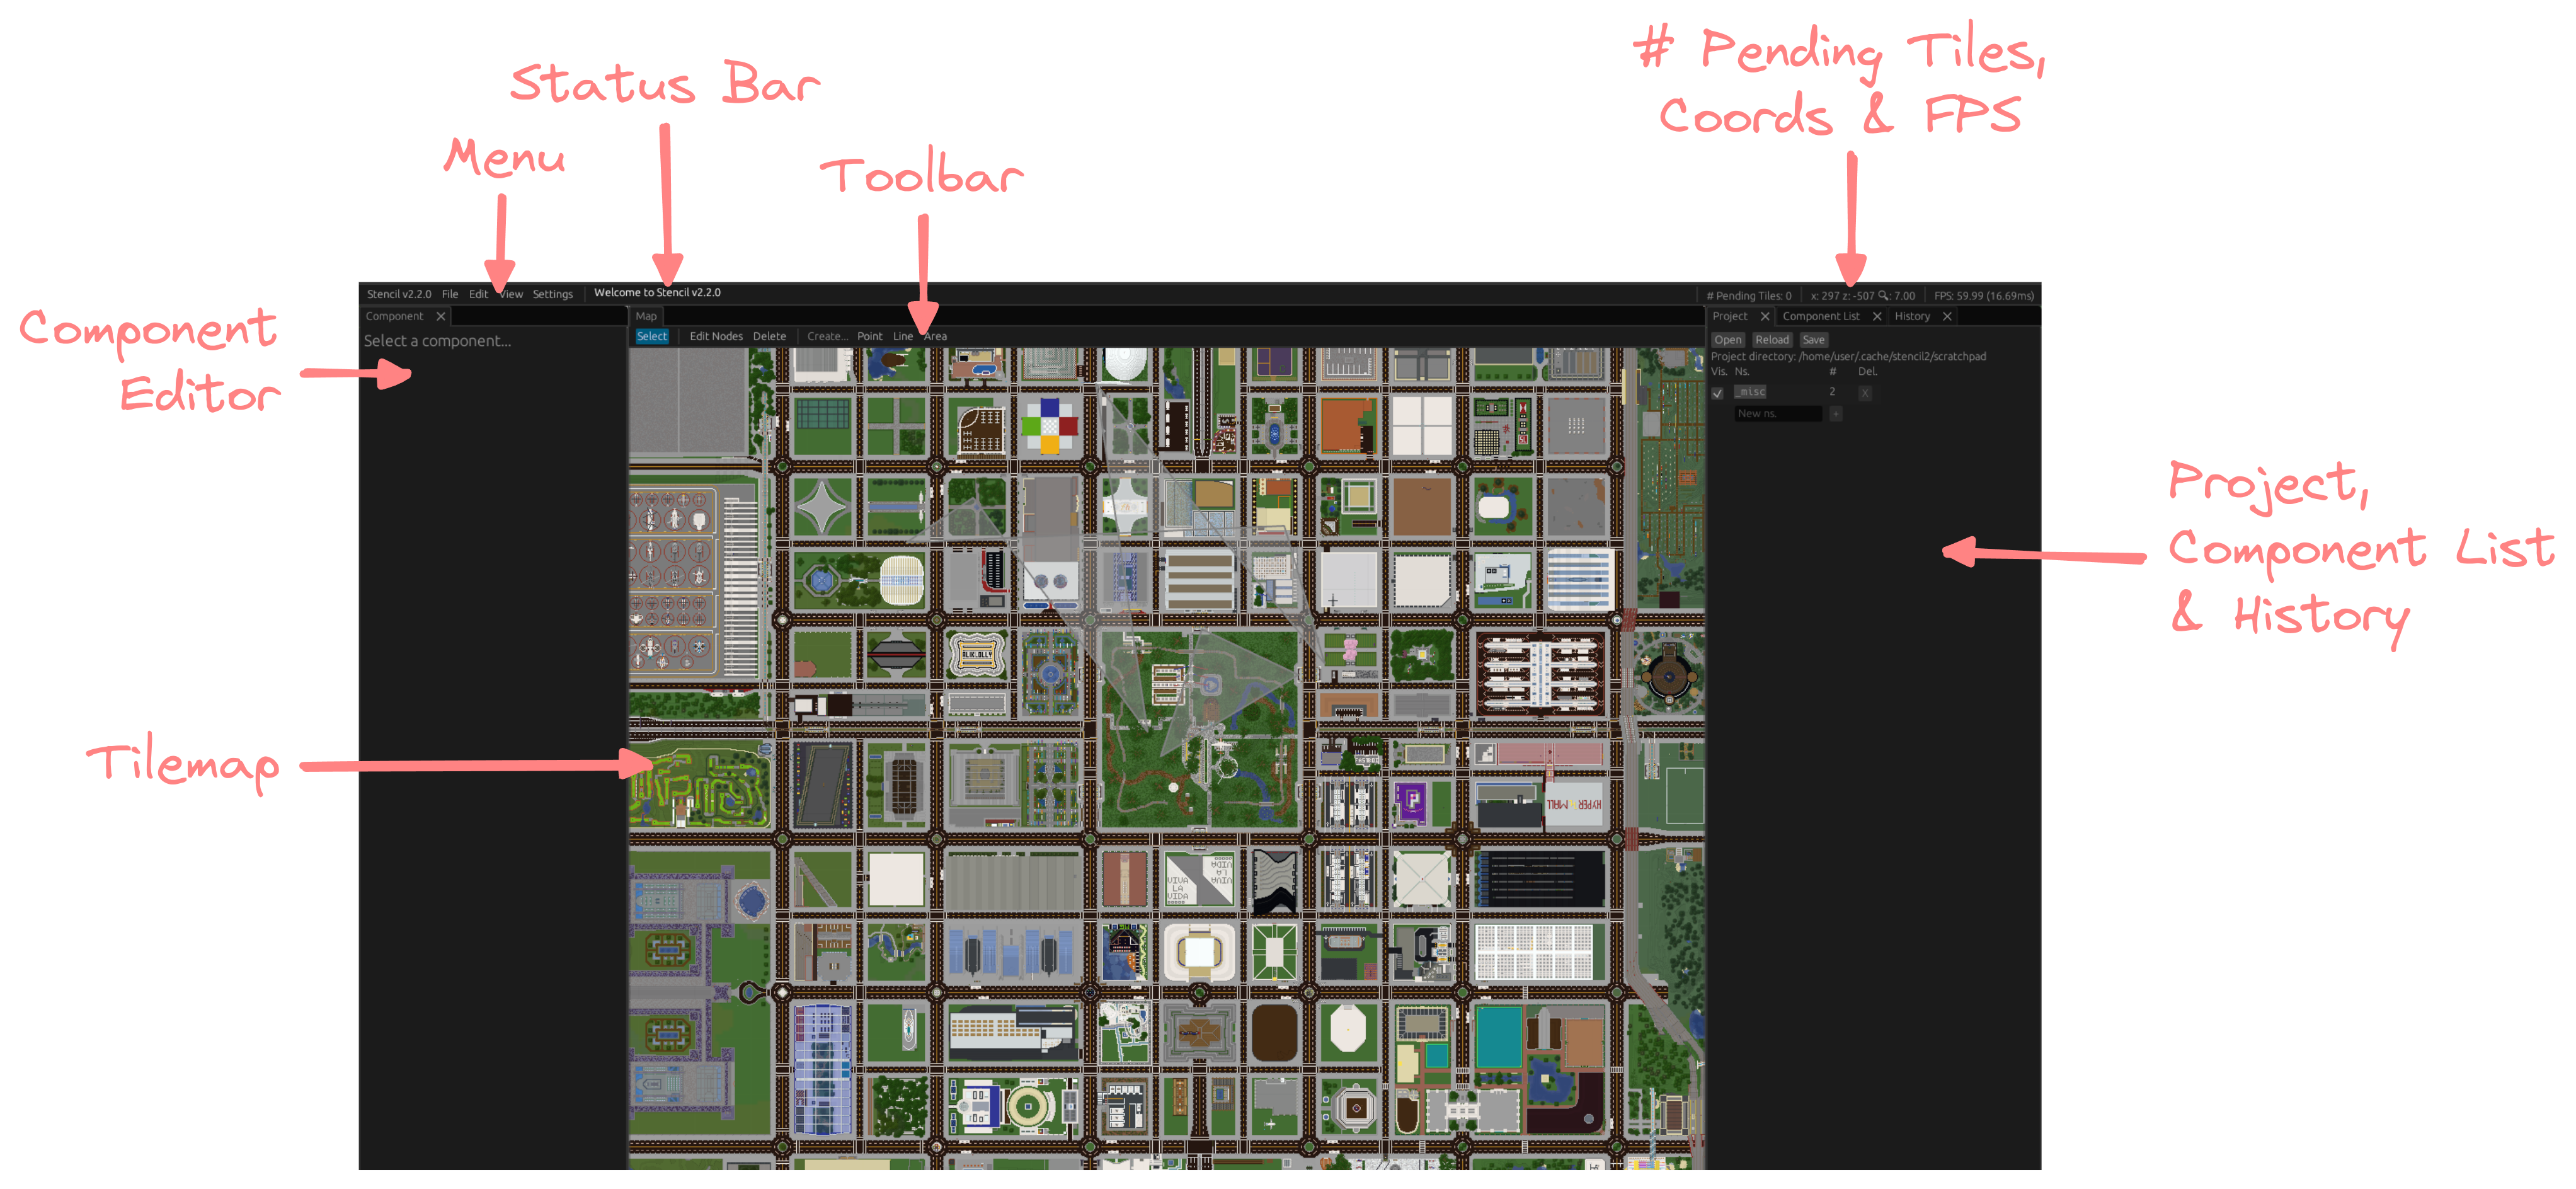
Layout
TODO image here
- The menu bar contains menu items in the order of Information, File, Edit, View, as well as a status message.
- The Informatiom category contains windows to show information about Stencil3 as well as settings and an option to quit.
- The File category contains functionality for manipulating projects and namespaces.
- The Edit category contains functionality for manipulating components.
- The View category contains options to open windows or move the tilemap.
- The status message shows help and/or status information about your current mode or recently done action.
- The average milliseconds per frame is shown here. On a good computer, this should be under 16.7ms/frame (60fps).
- The tilemaap takes up most of the window and is your primary work area.
- The toolbar lets you switch between modes.
- Select Mode allows selecting of compoments.
- Nodes Mode allows selecting of nodes.
- There are 3 Create Modes for point, line and area. It will also show options for the namespace new components will be under as well as its skin type.
- If the current project is not attached to any folder on disk, “NOT SAVED” will show here.
- The X and Z coordinte of your mouse cursor as well as your current zoom and an option to reset the map view.
- The Component Editor lets you edit the component data. It also shows the coordinates of the nodes of the component.
- The Project Editor lets you configure the project’s skin, basemap and namespaces. It also contains a list of components where you can select them, move them into view and delete them.
- The History Viewer shows your project history.
- You may find notifications showing up here. These are usually related to projects or namespaces. Any errors or warnings will also show here.
Select Mode
Component Editing
Create Mode
Nodes Mode
History
Project Management
Loading & Importing
Saving & Exporting
Map
UI
Shortcut
Miscellaneous
Directories
Environment Variables
Welcome to Stencil2’s manual!
Last updated for: v2.2.0
Stencil2 is a software maintained and built by the MRT Mapping Organisation to edit map data for the street map of the MRT City Map.
Installation
- Universal
- Cargo
- Run
cargo toolchain install nightlyif the nightly compiler isn’t installed - Run
cargo +nightly install --git https://github.com/MRT-Map/stencil2 - Launch stencil2 with
stencil2
- Run
- Cargo
- Windows
- Scoop (untested)
scoop install "https://raw.githubusercontent.com/MRT-Map/stencil2/master/build/windows/scoop.json"
- msi
- Download the .msi file in the assets folder of the latest GitHub release
- Open the .msi file and follow the instructions
- Launch stencil2 in file explorer in either
[Drive]:\Program Files\stencil2\binor[Drive]:\Program Files (x86)\stencil2\bin - Remember to pin it to start/taskbar if it isn’t indexed in the search bar ;)
- Scoop (untested)
- MacOS
- dmg
- Download the .dmg file in the assets folder of the latest GitHub release
- Open the .dmg file and drag the application into the folder
- Launch stencil2
- Homebrew
brew install --cask mrt-map/mrt-map/stencil2
- dmg
- Linux
- deb
- Download the .deb file in the assets folder of the latest GitHub release
- Extract & install the file… TODO write instructions
- Arch PKGBUILD
- Add to
/etc/pacman.conf:[arch-mrt-map] Server = https://mrt-map.github.io/arch-mrt-map/x86_64 SigLevel = Optional TrustAll sudo pacman -Sy stencil2
- Add to
- deb
Usage
See Basics and Advanced Topics
FAQ & Troubleshooting
- Can I use Stencil2 for general purpose map annotating?
- You technically can, though it’s not recommended
- I found a bug / problem! / Stencil2 crashed on me!
- In the data directory, check under the TODO folder for the latest panic log for an error message.
- If it’s to do with toml deserialisation, check that your toml files are syntactically correct.
- Otherwise, open an issue in this repository, and check if your issue is a duplicate of another one
- (You can also DM me on Discord, but if you have a GitHub account please use issues)
- In the data directory, check under the TODO folder for the latest panic log for an error message.
- Tiles don’t show up!
- Update: This has been found to be a problem with the UI. Shake your cursor over anywhere except the map to make the tiles load.
- Try reopening Stencil2. This is known to fix the issue on macOS
- If not, open up the window settings /
window_settings.tomland try disabling one of the backends and then restarting to see if it fixes the issue. This is known to fix the issue on Windows - Otherwise, raise an issue (recommended) or contact 7d
Layout
Loading a Project
- Under
Projecton the right panel, clickOpenand select a folder with PLA files in it (or a new folder) - A list of namespaces will be loaded along with the default namespace
_misc
Namespace Creation
- Under
Projecton the right panel, input the namespace’s name and click+ - Remember to do this before adding anything to the namespace, in case you forget (it does not have a way to mass-move components between namespaces yet)
Component Creation
Points
- Click
Pointon the toolbar or press4on the keyboard - Left-click on the map where you want your point to be
Lines and Areas
- Click
Lineon the toolbar or press5on the keyboard for lines; or - Click
Areaon the toolbar or press6on the keyboard for areas - Left-click on the map where you want the line/area to start. This is your first node
- Continue left-clicking to place more nodes and continue the line/area
- Hold down the left
altkey for angle-snapping
- Hold down the left
- If you had made a mistake with the previous node, left-click on the previous node to remove it
- Right-click to complete the line/area at the last node placed
- For areas, left-clicking on the first node completes it too
Component Editing
- Click
Selecton the toolbar or1on the keyboard, then left-click the component you want to edit
Editing Component Information
- A panel of text boxes and sliders should appear on the left of the screen
ns.is the namespace that the component belongs to. It should be a three-letter code that your project organisers have assigned, or that you have registered- If you have just created a namespace, remember to set it (before)
- This field should be automatically prefilled the next time you edit a component’s information
idshould be prefilled automatically with a randomly-generated IDDisplayed asis the text that would appear on the final mapDescriptionis a brief description of the componentComponent typeis what the component would show up as on the final mapTagsis a comma-separated list of tags on the component- e.g.
oneWaymakes a line one-directional
- e.g.
Layercontrols whether the component appears below or above other components- In lines,
Reverse directionreverses the order of the nodes. This is useful for one-directional components - A list of coordinates is shown as well below the information fields
- In lines, the green coordinate points to the start of the line and the red coordinate points to the end of the line. Both these coloured coordinates point to coloured handles on the component on the tilemap
Moving Components
- Right-click and drag the component to move it
Editing Individual Nodes
- Click
Edit Nodeson the toolbar or2on the keyboard - For the large circles:
- right-click and drag to move the node
- right-click without dragging to delete the node
- For the small circles:
- right-click to create a node
Deleting Components
- Click
Deleteon the toolbar or3on the keyboard - Left-click a component to delete it
Undo & Redo
- Click
Edit > Undoon the menu,uon the keyboard, orUndounderHistoryon the right panel to undo - Click
Edit > Redoon the menu,yon the keyboard, orRedounderHistoryon the right panel to undo
View All Components
- You can do this under
Component Liston the right panel - Click
Move tonext to a component in the list to shift the viewport to the first node of the component
Saving the project
- Under
Projecton the right panel, ClickSave - There is also an autosave every 1 minute
Deleting a namespace
- Under
Projecton the right panel, hide the namespace and then clickX- Namespaces can only be removed when it has no components
Quitting
- Click
Stencil v(version) > Quiton the menu orescon the keyboard to quit
Configuration
Tilemap settings
Under Settings > Tilemap, you can set
- the initial zoom level
- the base map to use
Adding a base map
Scroll to the bottom and click Add and a new base map entry will be created for you. Alternatively, click Import to import a file containing a base map configuration (TOML file). An example of this file can be seen when you export any entry you have.
Selecting a base map
Click Select next to the number in a base map entry and it will be hoisted to the top. The topmost entry is used in the tilemap.
Exporting/Deleting a base map
Click Export/Delete next to the number in a base map entry.
Configuring the window
Under Settings > Window, you can set
- the GPU backends to test for and use
- the window mode (fullscreen, windowed, etc)
- on Linux, the display protocol (Xorg/Wayland)
Configuring the key mappings
Under Settings > Keymap
Configuring miscellaneous settings
Under Settings > Misc
Notification Log
All notifications that have been sent are also logged to View > Notification Log.
File System Data
The data directory of Stencil2 is
%APPDATA%/Roaming/stencil2on Windows~/Library/Application Support/stencil2on macOS~/.local/share/stencil2on Linux
tile_settings.toml
TODO UPDATE The file version of the tilemap settings. TOML spec here
Defaults:
# The base URL of the tiles to pull from. Must be a valid URL, most likely of the form
# `<url>/tiles/<world>/flat` where `<url>` shows the server's Dynmap client and
# `<world>` is the ID of the world that you want tiles for
url = "..."
# The zoom level of a tile in the maximum zoom
max_tile_zoom = 8
# The distance that a tile of the maximum zoom level represents
max_zoom_range = 32.0

# The zoom level to start with when opening Stencil2
init_zoom = 7.0
window_settings.toml
TODO UPDATE The file version of the windows settings. TOML spec here
Defaults:
# Optional. Used by Winit to decide the type of fullscreen of the window, or whether it is fullscreen
# Possible values: `Windowed`, `BorderlessFullscreen`, `SizedFullscreen`, `Fullscreen`
window_mode = "Windowed"
# Optional, Linux only. Used by Winit to decide whether to start the window with Xorg or Wayland
# Possible values: `Auto`, `Xorg`, `Wayland`
display_server_protocol = "Auto"

# Optional, each variable must be included if specified. Used by Wgpu to decide which GPU backend to render with
[backends]
vulkan = true
metal = true
dx12 = true
dx11 = true
keymap_settings.toml
TODO UPDATE
misc_settings.toml
TODO UPDATE
logs
The log files that are output by Stencil2. Feel free to delete them if they grow too large, but it may be useful for debugging
panic
The panic log files that are output by Stencil2. Feel free to also delete them if they grow too large, but it may also be useful for debugging
Environment Variables
When starting Stencil2 from the command line, you can specify some environment variables to change how it behaves
These are not included within Stencil2’s configuration/settings menus because they mostly serve as debugging tools
NO_DOWNLOAD=trueIgnores the configured tilemap and renders a white and gray checkboard as the tilemapRUST_LOG=...Configures the logger. Acceptsenv_loggersyntax. Configurations with low levels set (trace) tend to affect both performance and disk memory. Be warned :)